Lo que necesita para conectar una cuenta real CQG/Continuum:
- Póngase en contacto con su broker e infórmele de que desea operar a través de ATAS.
- El broker en el back office de CQG CAST añadirá ATAS (identificador en el sistema: AdvancedTS) a la lista de plataformas disponibles para su cuenta.
- A continuación, podrá conectar su cuenta CQG a través de la plataforma anterior o de ATAS.
Importante: el login CQG le permite conectarse sólo a una plataforma a la vez, es decir, puede operar en diferentes plataformas, pero por turnos. Para conectar su cuenta a diferentes plataformas al mismo tiempo, debe solicitar un login CQG adicional a su broker.
Para configurar la conexión CQG a la plataforma ATAS, vaya al menú de la ventana principal de la plataforma ATAS y haga clic con el botón izquierdo del ratón en Conexiones / Connections en la ventana principal de la plataforma.
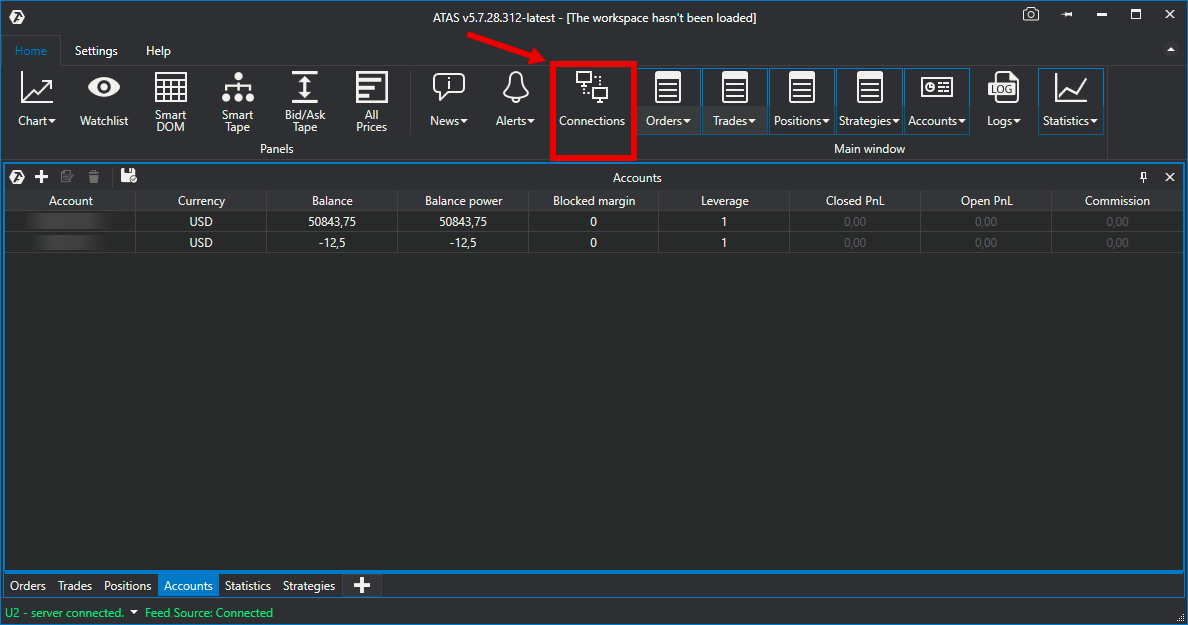
A continuación se abrirá la ventana de conexiones:
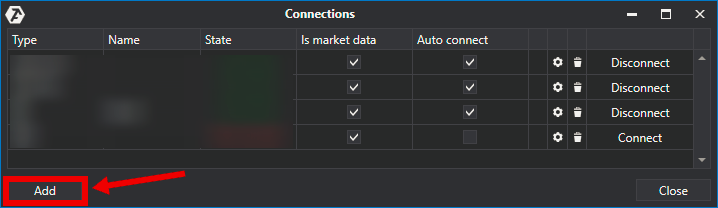
Para añadir una nueva conexión, haga clic en el botón Add/Añadir.
A continuación se abrirá una ventana con la lista de cuentas y proveedores de cotizaciones disponibles:

En esta ventana seleccione el tipo de conexión CQG, y pulse el botón Next/Siguiente.
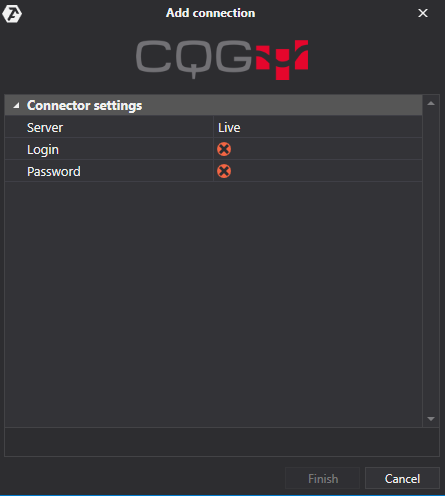
A continuación se abrirá una ventana de conexión a CQG…Si ya tiene un login y contraseña de una cuenta real, ingréselos en los campos correspondientes y seleccione el tipo de conexión Live, luego haga clic en Next/Siguiente.
* Logging level - ¡el nivel de registro es seleccionable por el usuario! El grado de información sobre la cuenta conectada depende de la elección del nivel (es decir, lo que se mostrará exactamente en los registros es necesario para detectar y eliminar el error). Hay 4 niveles de registro disponibles:
- Debug / Depuración
- Info / Información
- Warning / Advertencia
- Error / Error
Una vez configurada, la conexión aparecerá como una línea separada en la ventana de conexiones:
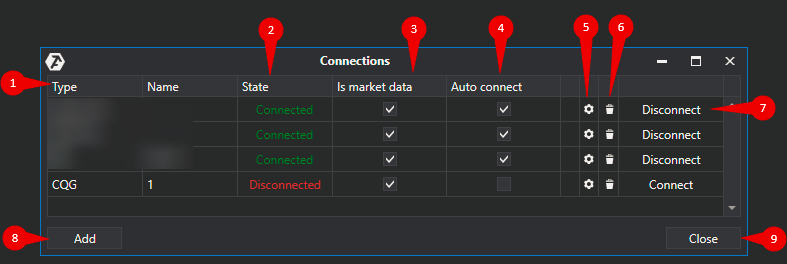
1. Type / Tipo - Fuente de la conexión.
2. State / Estado de la conexión. Después de añadir una nueva conexión, su estado por defecto es Disconnected/Desconectado. Para conectarse, haga clic en el botón Connect/Conectar.
3. Is market data/Proveedor de cotizaciones - Opción para seleccionar el proveedor de cotizaciones.
Importante: ¡para los mercados ruso y americano sólo debe conectarse una fuente de cotizaciones!
4. Auto connect / Autoconexión - Si desea que la conexión se produzca automáticamente al iniciarse la plataforma, debe activar esta opción
![]()
5. Botón para configurar la conexión.
![]()
6. Botón para eliminar la conexión.

7. Botón para activar/desactivar la conexión.
8. Botón para añadir una nueva conexión.

9.Cerrar la ventana de conexiones.
¿Le ha sido útil este artículo?
¡Qué bien!
Gracias por sus comentarios
¡Sentimos mucho no haber sido de ayuda!
Gracias por sus comentarios
Sus comentarios se han enviado
Agradecemos su esfuerzo e intentaremos corregir el artículo